| |
Annual
Overview:
Analysis of monthly
figures
I. General
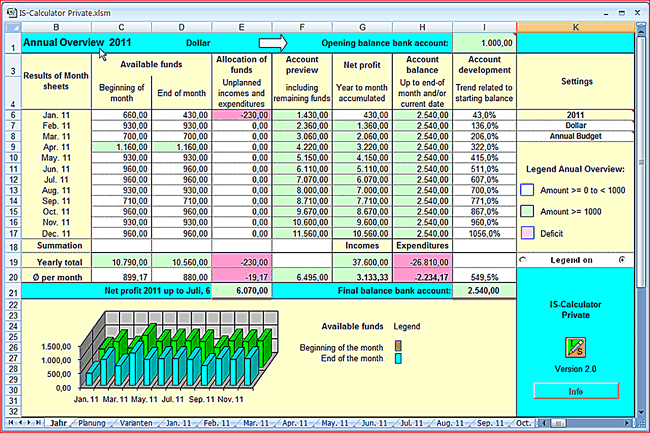
This Excel application
calculates the available budget for each of the 12 months of the current
year. With just a few key figures shown in the Annual overview, your
financial situation becomes clear. Moreover, it is possible to trace
how the amount available in the current month is changed through unplanned
expenses or income.
This Excel workbook was developed for private use. It is regularly
used by the developer himself. Before Excel was available on PCs,
a simple precursor to Excel 85 was designed on an Apple Macintosh
and later on a PC under Windows. Since then, many ideas and improvements
to the present application were incorporated.
Objectives and
results of this calculator:
Computation of the monthly budget. Calculating and tracking how
the regular income and expenditure throughout the year have an ongoing
affect on the available budget differently for each month. Observing
how any unexpected costs (to be recorded as they occur) during the
current month influence the free monthly and yearly budget.
Experience:
Planning gives
you security when it becomes clear what free budget is available
for each month, and what remains of the budget when unplanned expenditure
and revenues are extrapolated up to the end of the month. If the
figures in a certain month turn 'red', it is easier to deal with
if you can see the previous and anticipated development until the
end of the year.
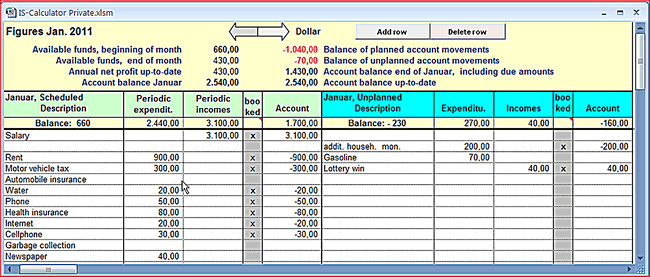
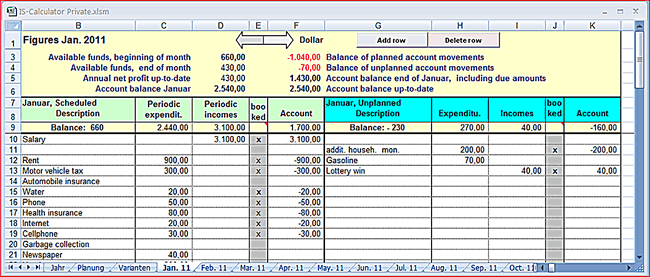
One Excel sheet
per month, showing scheduled and unplanned amounts.
II. Requirements:
MS
Excel Version 2000 und above.
III. Limits:
The number of
rows for input areas can be extended or reduced by any number. The
upper limit is the Excel row limit.
If rows are
added or removed in one sheet, the changes are applied to all data
sheets at the same time. This is done with the buttons at the top
of the data sheet.
IV. Installation:
The program is
installed by the "isCalculatorInst.exe" installer, which
is contained in the downloaded .zip file "isCalculatorInst.zip".
After installation the program is available in the folder "C:\IS-Calculator
Private. 
V. Application:
When newly
installed the data sheets are blank. To see an example with user data,
go to the menu "Backup -> Update with backup". A presentation
of user data is then shown. Then close without "Saving" if
you want to start the next session with an empty workbook. A detailed
description follows "Getting Started" in the next paragraph..
A. "Getting Started":
Using
backed-up samples of revenues and expenditure (described above), the
program creates a budget plan for the calendar year. To try out the
functionality, sample data are used from the preinstalled internal backup.
To do this, click the menu "Backup ->Update with backup"
as mentioned above. Confirm the info box note "Update with Backup
in the foreground?" by pressing "Yes".
The actions are then displayed in the foreground. This updates the data
in the "Annual overview" data sheet as well as in "Annual
Planning", "Variance Budgeted" and the 12 monthly data
sheets with the corresponding data from the Backup. The results are
shown in designated areas of the different data sheets. Now when you
view the Annual overview, the changing financial situation becomes clear,
specifically for each of the 12 months..
Note: To begin with empty data sheets after this, you should close
the session without "saving".
B. Implementation uses Windows user functionality within Excel
sheets:
Entries and changes
have different effects, depending on the data sheet.
All cells that are not prepared for entries or double click sensitivity
are read-only. The gray areas are double click-sensitive.
1. The
gray cell areas are designated for input and/or double click
sensitivity.
Double clicking
on a gray cell normally inserts an "x". In the "Annual
Budget" data sheet, double clicking a cell under the pane named
income / expenditure categories inserts the number of each calendar
month into the designated cell(s) in the month block to the right
of it, named ”Month due”; whereas double clicking
a single cell of this block removes the number in it (and also removes
the booked amount in the respective monthly data sheets automatically).
When you enter
text into these cells under the pane named income / expenditure
categories in the "Annual Budget" data sheet the same
text is automatically inserted into all relevant monthly data sheets
in which the amount of income and expenditure was additionally
booked automatically for the activated month. In the "Variance
Budgeted" data sheet gray fields are completely protected whereas
white fields are open for input. White columns in the monthly data
sheets are also intended for input.
2. Amounts entered into “expenditure” deletes
content in “Income” in the same row, and vice versa.
3. Navigation
(Note: Using Excel 2007 and higher the application-specific
menu can be found under "Add-ins").
-
to jump to a "month" data sheet from the data sheet "Annual
overview" double click the month in the pane under the headline
Results of Month sheets
-
use the navigation buttons (arrows) to switch between data
sheets
-
a menu
item under Window Selection lets you switch to different views and
data sheets.
-
when opening
the workbook navigation is "automatic". You can select
which data sheet to show in "Annual overview" -> Settings:
The selected data sheet will be displayed when the workbook opens.
You can select this from a list box, for example
"Current month" for the data sheet of the present month.
-
last but
not least: you can click on the register button at the bottom of
the workbook window.
4.
Adding and deleting rows
Rows
in all relevant data sheets are added or removed simultaneously. This
is done with the "Add row" and "Delete row" buttons
at the top.
5 . Menu "Backup" for internal backup,
menu items
The
best approach to backing up is always to use the Windows feature to
copy the whole folder or make a copy of the workbook itself. Alternatively
the calculator offers the possibility to backup all the present data
in all data sheets to a backup data sheet inside the workbook, so
that you can reset the workbook if necessary.
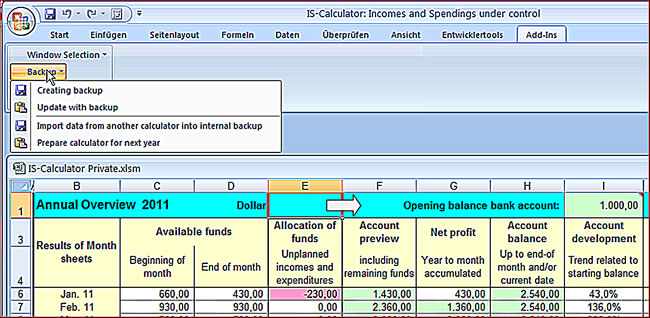
a. Menu item "Creating backup"
Saves the current data of the whole workbook
file to the data sheet "Backup" (hidden).
b. Menu item "Update with backup".
Overwrites whole workbook with the backup
data.
c. Menu item "Import data from another
calculator into internal backup"
Overwrites the current "Backup"
data sheet with the extract of the data collection from the selected
workbook
d. Menu item "Prepare calculator for
next year" (resetting the workbook for the next year):
Step
1: Shows the number of the following year, which can be changed.
Step 2: You are prompted to back up the data from the old year in
"Backup" before resetting all of the monthly data
sheets for the new year,.
Step 3: Except for the data sheet "Annual Budget" all
data sheets are deleted and new/empty data sheets are created.
C. There are four types of Excel data sheet:
1. "Annual
Overview"
2. "Annual Budget"
3. "Variance Budgeted"
4. Months data sheets (12)

1. Data Sheet "Annual Overview":
Changing Opening balance bank account:
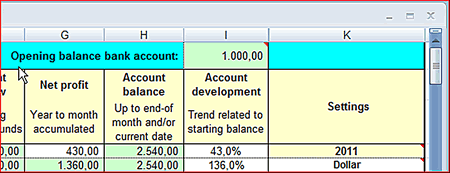
When using the workbook for the first time, the
“old” balance of your present account statement should
be assigned as the “Opening balance bank account“
in the data sheet Annual Overview (you only need to do this once
for the present year). Then make sure you completed the input in
the Annual Budget data sheet and update the section titled
"Unplanned" in the current monthly data sheet
with the corresponding account transactions by entering its description
and amount. Now you need to activate the amount items in this bank
account statement with an "x" (double
click the respective cell in the column named “booked”
to do so) with the corresponding amounts in the current monthly
data sheet.
After this,
the amount of Account balance up-to-date in the
upper right part of the monthly data sheets should be equal to the
“new” balance of your bank account statement.
If you start working with the Calculator workbook in the middle
of a year, rather than at the beginning – which is actually
quite normal - all the "monthly bookings" in the month
block (titled "Month due") of the "Annual Budget"
data sheet must be deactivated by double clicking the month
number in the respective column of the Month due block. You need
to repeat this up to one month before the actual month of the first
bank statement. This gives you correct and distinct values in the
accumulations shown in the upper part of the months data sheets.
"Settings", available in Data Sheet "Annual
overview"):

a. Changing the currency (cell K7) replaces the
currency text in all data sheets.
b. The default data sheet to display on opening
the session, is available in a selection list (cell K8)
Recommendation for setting the default data sheet when opening
the workbook:
- Select
"Annual Budget" until you completed your annual planning
in the Annual Budget data sheet.
- The
norm is "Current month" for updating the current monthly
data sheet with the amounts of planned and unplanned
income and expenditure, and to view the present extrapolated
amounts in the upper part of the month
data sheets.
- If
you prefer to focus on all the offered accumulated amounts throughout
the year, select "Annual overview".

2. Data Sheet "Annual Budget":

a. The descriptions / categories of your income,
expense, revenue and expenditure can be registered in the column Incomes
/ expenditure categories. Insert the expenditure amounts in the expenditure
column, and revenues in the Income column.
b. Double clicking a cell in the Incomes
/ expenditure categories column activates the inserted amount for
all of the 12 monthly data sheets; double clicking again
removes the entries. A single month can be removed or activated by
double clicking the respective month column in the cell block
titled "Month due".
3. Data Sheet "Variance Budgeted":
In this data
sheet the amount for a certain month that has been designated in
a category in Annual Budget can be overwritten. This is
necessary, for example, if your "planned" salary differs
from month to month.
 
4. 12 monthly Data Sheets showing:
Last updated May 2019
|


